How to Upload Images in Deliverit Studio
🟩 Log In to Deliverit Studio
-
Sign in with your DPOS Cloud credentials
🟩 Open Image Library
-
Click Image Library from the left-hand menu
-
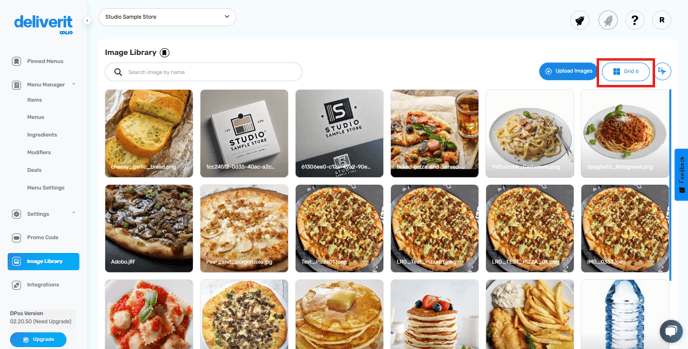
Switch between 12-grid and 6-grid views if needed
🟩 Upload Images
-
Click Upload Images
-
Click Browse Files and select your images
-
Click Upload, then Finish
🟩 Assign Images to Menu Items
-
Go to Menus
-
Select a menu and choose an item
-
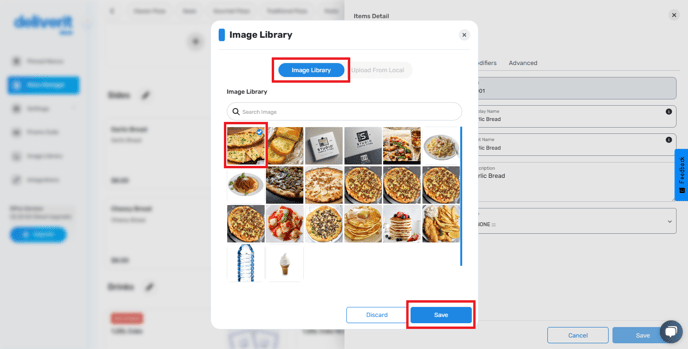
Click the Change Image icon
-
To use an existing image: select from the library and click Save
-
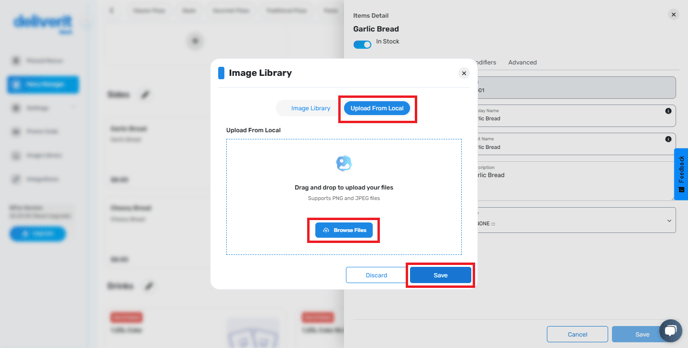
To upload a new image: click Upload from Local, select a file, then Save
-
To remove an image: click Remove Image, then Save
-
🟩 Deploy Changes
-
Click the Rocket icon
-
Click Deploy to apply updates
-
Refresh your ordering site to see changes
Image Upload Guidelines
-
The file name must be unique
-
Image size must be 600KB or smaller
-
Allowed formats: JPEG, JPG, PNG
-
The file name should be under 100 characters
Log in to Deliverit Studio
- Open your browser and go to https://my.deliverit.com.au.
- Enter your DPOS Cloud account credentials to sign in.

Access the Image Library
- From the left-hand navigation bar, click on the Image Library tab.
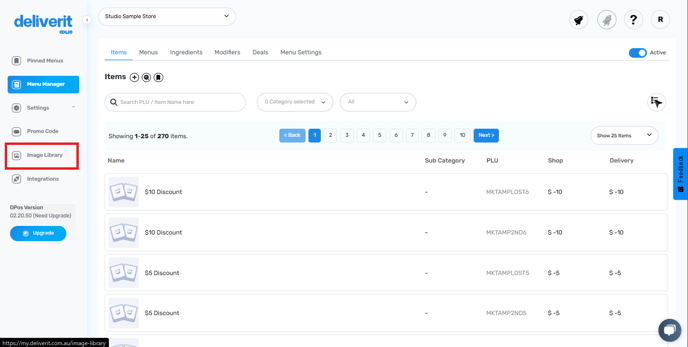
- You will now see all your previously uploaded images.
- You can switch between 12-grid
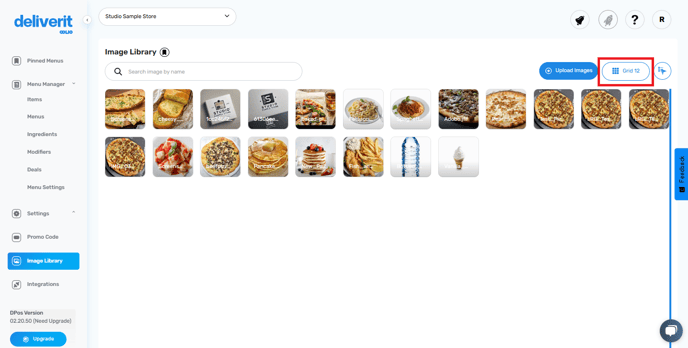
- and 6-grid views for a more convenient browsing experience.
Upload New Images
Click the Upload Images button.

Click the Browse Files button.

Select the images you want to upload from your device.

Once you have selected the images, click Upload.

After the upload, click the Finish Button.

Your newly uploaded images will now appear in the Image Library.

Assign Images to Menu Items
Click on Menus in the left-hand menu.

Select the appropriate menu from the drop-down list.

Choose the specific item to which you want to add an image.

Click the Change Image button.

- If the image is already in your Image Library, simply select it and click Save.
- If you need to add a new image, click Upload from Local, choose the file, and then click Save.
To remove an existing image, click the Remove Image icon and then Save.

Deploy the Changes
Click the Rocket icon to apply the changes.

Click Deploy to confirm.

Refresh your website to see the updated images.
Tips for Successful Image Uploads:
- Avoid Duplicate File Names: Images with duplicate names cannot be uploaded.
- File Size Limit: Images must be 600KB or smaller.
- Supported File Formats: Only JPEG, JPG, or PNG formats are allowed.
- File Name Length: File names should be 100 characters or fewer.
By following these steps, you will be able to efficiently upload and manage images in Deliverit Studio. If you need further assistance, simply click the blue chat icon at the bottom-right corner of the screen to connect directly with our Application Support Team.