Creating a Backup of DPOS Data Files
This guide helps you secure your store's data by creating a backup of DPOS files. Stores can use this when safeguarding transaction history, employee records, and system settings.
How to Create a Backup of DPOS Data Files
Log into DPOS:
Sign in with your username and password.
Access Backup Settings
- Navigate to the Utilities section from the main menu.
- Click on Backup/Restore.
Prepare for Backup
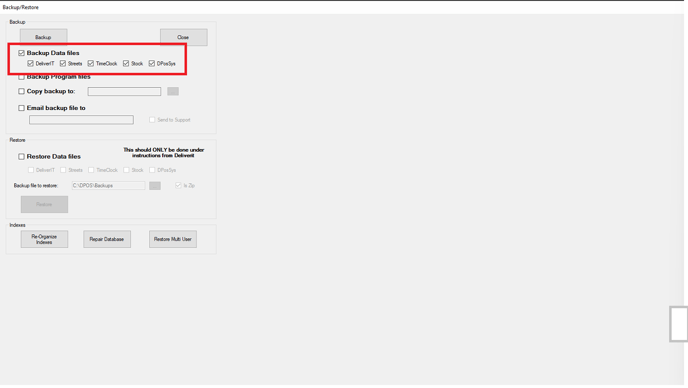
- Ensure the "Backup Data File" checkbox is selected.
- Check the following additional backup options:
- DeliverIT
- Streets
- TimeClock
- Stock
- DPosSys
Start Backup Process
- Click the Backup button to initiate the process.
- Once completed, a message will appear stating: "Database backup finished OK."
- The backup file is stored in: C:\DPOS\Backups.
This process ensures your store's data is securely backed up and can be restored if needed.
Log in to Dpos
Use your username and password to access the Dpos system.

Go to Utilities
Once you're logged in, find the "Utilities" section in the Dpos menu.

Find Backup/Restore
In the Utilities menu, look for and click on the "Backup/Restore" button.

Prepare for Backup
Make sure the "Backup Data File" checkbox is selected.
Also, check the boxes for the following items:
- DeliverIT
- Streets
- TimeClock
- Stock
- DPosSys
Start the Backup
Click on the "Backup" button to begin the process.

Confirmation Message
Once the backup is done, you'll see a message saying "Database backup finished OK."

Find Your Backup File
You can find the backup file on your computer. The location is: C:\DPOS\Backups.

Tip: Keep a USB thumb drive handy. Every 30 days, copy the latest backup from this location to your thumb drive.
By following these steps, you will be able to create backup data on DPos efficiently. If you require further assistance, please contact our application support team.