Prerequisites
Only customers who meet all the following conditions will appear in the recipient list and receive push notifications:
✔ The customer has an Online Ordering account
They must have registered through any Mobile Ordering App (IOS/ ANDROID).
✔ The customer is logged in on a mobile device
Notifications are only delivered if the user is actively logged in on the mobile app.
✔ Push notifications are enabled on the customer’s device
They must have granted permission for push notifications on their phone or tablet.
Note:
If any of the above conditions are not met, the user will not appear in the push notification recipient list and will not receive the message.
Key Features
With Push Notifications, you can:
- Create and send custom notification campaigns.
- Schedule messages for a future date and time.
- View all upcoming and past campaigns in Scheduled & History.
- Track the status of each notification (In Progress, Delivered).
How to Access Push Notification Campaigns
Follow these steps to find and set up your push notification campaigns:
Step-by-Step Guide
Log In to Studio
Sign in to your Studio dashboard using your account credentials.
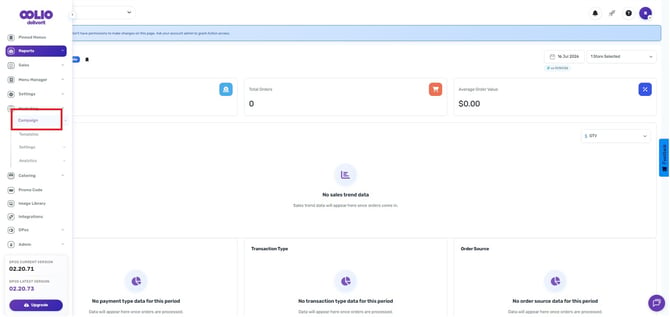
Select Marketing
Inside the Settings menu, click Marketing to open all campaign-related tools.

Open Campaign Options
Click Campaign to view your communication and campaign configuration.
Select Communication
Under Campaign settings, click Communication.
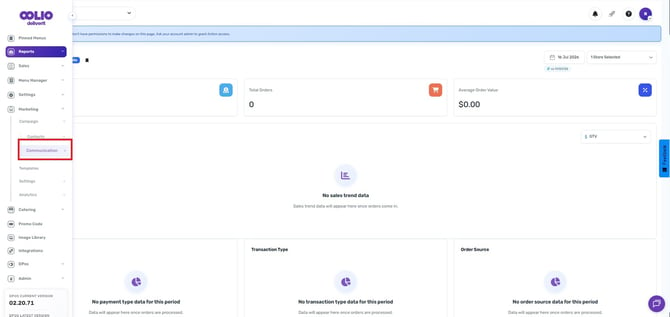
Go to the Push Notification.
Select the Push Notification tab to begin creating or managing notifications.

Creating a Push Notification
Follow these steps to create a new push notification:
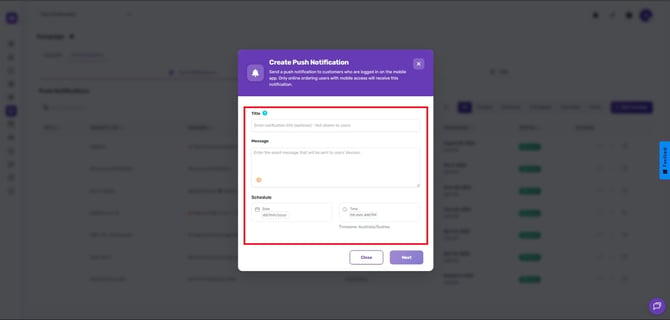
Click “Add Campaign”
This opens the notification setup window.

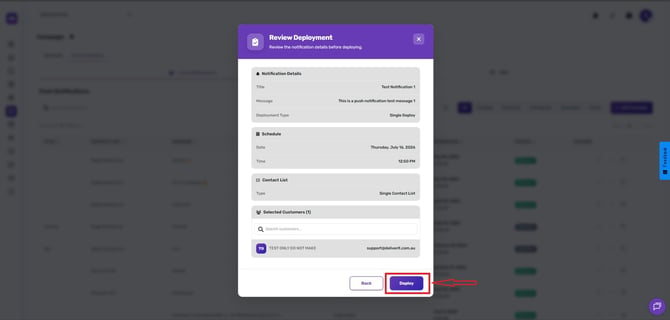
Fill Out the Required Fields
Complete the fields in the modal:
- Title
A short headline or campaign name.
- Message
The body of the notification. Emojis are supported (🎉🔥📣).
- Schedule Date & Time
Set when the notification should be sent. You may choose to send it immediately or schedule it for later.
-
Click Next.

-
Search for or select the customer(s) you want to deploy to.

-
Enable the All button to select every customer.

-
Click Review to confirm your selections and settings.


When everything looks correct, click Deploy.
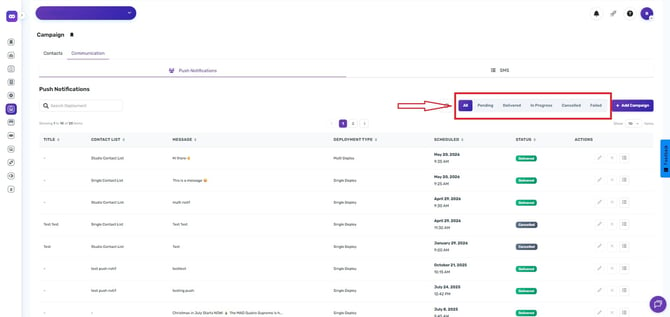
Here, you can view the current status of your notifications.
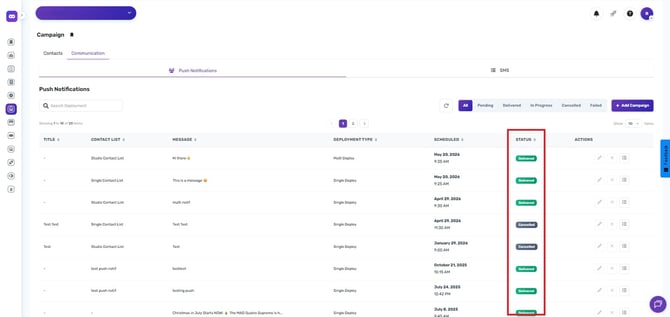
You can also filter the results by:
-
Pending - Shows notifications that are queued and waiting to be processed
-
Delivered – Shows notifications successfully sent.
-
In Progress – Shows notifications that are still being processed.
-
Failed – Shows notifications that were not delivered.
-
Cancelled - Shows notifications that were stopped before delivery.
-
If the campaign is already in progress, further edits to the message are restricted.

Push Notifications are a powerful tool for increasing customer engagement and staying connected with your audience. Make sure your contact lists are updated, and your customers have enabled push permissions to maximize your campaign reach.
If you need further assistance, click the blue chat icon at the bottom‑right corner of the Studio dashboard. This connects you directly to our Application Support Team for live help.